The info directory is an app you can add to the page and is used to help users find specific Forms, Policies & Procedures, Templates & Samples, How To’s & Manuals, etc.

Setting up the Info Directory web part
-
Create a brand new list on the site called [Info Directory]
-
Next, go to [*] → Site Information → View all site settings and click [Site content types]
-
Click [Create content type] and set it up with the following settings:
Name: Info Directory Post
Category: Custom Content Types
Parent category: List Content Types
Parent content type: Item
(see below for reference)

-
Click [Add site column] → [Create new site column]
-
Add these columns with respective types:
InfoPostAttachments: Multiple lines of text
InfoPostBody: Multiple lines of text
InfoPostTags: Multiple lines of text
InfoPostTitle: Single line of text -
Navigate to the List Settings of the Info Directory list you created in step 1
-
Under Content Types click [Add from existing content type] and select [Info Directory Post] from the list.
-
Change the order of content types by unchecking the [Item] content type from list of available options:

-
Navigate to the page where you’d like to see the Info Directory app and add it to the page. Add at least one item to the Info Directory
-
Update your new site search configuration by following these steps:
10.1 Click [*] → Site information → click the [View all site settings] link
10.2 On the next page, find a section titled Search and under it, click the [Configuration import] link as shown below:

10.3 Give the following search configuration file to the system
10.4 Click [Import] and ensure there are no import errors.
You can now add more items as usual and they will start appearing in the new Info Directory in about a minute when the search crawl picks them up.
Adding new articles to the directory
- Navigate to the appropriate directory (ex: Forms, Templates etc.)
- On the main page of the directory, [+ New] button
a. Set the [Heading] to be the title of your post or an asset
b. [Description] will hold the description of the asset or a post. This section will show up when users roll down the article/asset item - Add an existing [Tag] by starting to type and picking the tag from suggested one OR Type a brand-new tag and hit enter to create it

- Optionally, if you have a file or a link, you’d like to be attached to the article, click the [Add File] button and provide a friendly Title and the URL of the link or a file.
If you have a document you need to upload click the ellipsis icon next to the URL

When you upload a file from your computer, it gets stored in the [Site Assets] library on the SharePoint site.
If you’re adding a link to a file, be sure that the file is accessible to other users. If that file is in SharePoint, be sure that the library or a file is shared.
- Click [Submit] to save the post. Note it’ll take a minute or two for the new content to start appearing in the directory.
Adding/ importing multiple items from Excel
To import over 1000 items we recommend using a PowerShell script:
How to import large volume of SharePoint list items from CSV to a SharePoint Online list
If you’re only importing a small batch of 100 or 200 items, use these steps:
- Select [Site Contents] under [*] on the respective directory page
- In the list of apps following, select [Info Directory] and click [Settings]
- Click the [Advanced Settings] link
- Scroll all the way down to the [List experience] section as shown below, and set the experience to Classic

- Click OK
- Navigate to the Info Directory list and click the [edit] button as shown below

- The list will open in Grid View mode
- In your Excel sheet:
8.1 Copy the items that will be Title of the Item into the [Title] and [InfoPostTitle] columns, as shown below:
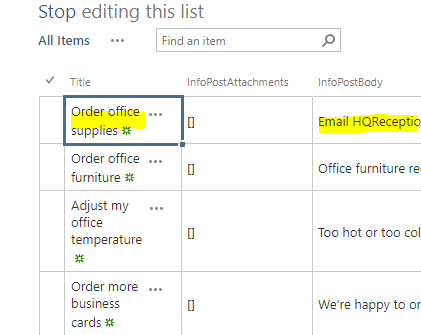
8.2 Copy the items that will be the Body of the Item into the [InfoPostBody] column. - Click [stop] editing as shown below, to save changes:

Deleting articles from the directory
- Navigate to the appropriate directory (ex: Forms, Templates etc.)
- Find the post you’d like to delete and click the edit button next to the item.

- Click delete as shown below:

Sort results alphabetically
Info Directory will sort results by relevance and popularity according to the SharePoint search, but you can override this by sorting the results by relevance.
To do that:
- Navigate to the page where you have your Info Directory and [Edit] the page.
- In Info Directory webpart properties find the configuration [Sort by Alphabet] and turn the toggle to [On]

- Save the page and refresh it.
Choosing tags / refiners shown to users
You can limit the tags users are allowed to refine the results on. In this example, only 3 tags have been chosen.

Since users won’t be able to filter by other tags and get to that content, be sure to make other items available in a secondary Info Directory (see: Advanced: Two (or more) separate directories on one page).
To set this up:
-
Edit the page where you have your Info Directory app
-
Access the app properties

-
Enter the tags you’d like to show in the [Tag Filter] property (multiple tags need to be separate by comma)

-
Save the page
Advanced: Enabling search analytics
You can enable Info Directory to track what users search for and how many results they get in return. This way you can optimize searches that get no results and find out the most popular searches.
Here is how to set this up:
- Access the web part properties for the Info Directory you need to track.
- Turn on the [Track Search Analytics]

- In [Site contents] of your site, access the settings of the list called [DirectorySearchAnalytics]

- Click [Permissions for this list]
- Ensure the [Visitors] group has the [Edit] access on this list. This will ensure that the Info Directory can save search keywords each time a visitor tries to search for anything.
How to use this feature:
- Access the list called [DirectorySearchAnalytics] on the site where you enabled analytics
- Enable grouping by the [Title] field in the SharePoint list view
- You can now see all keywords used, who searched for the keyword and when, how many results were returned:

Advanced: Updating existing Tags for Directory
- Select [Site Contents] under [*] on the respective directory page
- In the list of apps following, select [Info Directory]
- Find the item(s) which have been tagged with an old tag and edit the item
- Update the value of the [InfoPostTags] as necessary
- Save the item
Advanced: Displaying two (or more) separate directories on one page
You can separate the content into two or more separate directories and have them both reside on the same page.

Here is how to set this up:
-
Make a copy of the Info Directory list as described here:
Making a copy of any list such as FAQ, Quick Links or Info Directory
Be sure to grab a list name you specified in step 2 of the sequence -
Upload items to Info Directory by using a script.
Be sure new items you add to the list are of Content-Type [Info Directory Post], otherwise, they won’t show in the directory.

-
Enter the name of the list you’d like to pull the items from in the field called [New Items List]

-
Repeat steps 3 and 4 for each new Info Directory list and app you’d like to have on the page.
-
Save the page
Advanced: One directory reading from two or more separate lists
You can set up Info Directory to read from two or more separate lists. As long as all lists are on the same site collection, the Info Directory app will read from all of them automatically.
Here is how to set this up:
-
Make a copy of the Info Directory list as described here:
Making a copy of any list such as FAQ, Quick Links or Info Directory -
Upload items using a PowerShell script or Info Directory UI (with the caveat below).
NOTE: When authors click [+New] in the Info Directory app on the page (see below)
,
The directory will only save new items into a primary list set in web part properties under the [New Items List]

You can combine this set-up with the one described below in the section [Advanced: Limiting permissions on items in the directory] to chose who can see which items
Advanced: Limiting permissions on items in the directory
You can choose to show some items in the directory only to certain groups or users.
If there are only a few items that have unique permissions, you can set those in the same way as described for the Quick Links in this post: Quick Links (legacy)
scroll to a section titled Targeting select Quick Links to show only to specific groups or users
If there are many items you’d like to target to specific users, it’s easier to create a new list for those items as described above in Advanced: Two (or more) separate directories on one page.
You can then set up unique permissions on that secondary list as described here: Customize permissions for a SharePoint list or library - Microsoft Support
Only users who have that list available to them will see items coming from it in the Info Directory.
Known Limitations
- Info directory will display tags (example:
 ) from the first 500 items. This is the limit of how many items can be retrieved at once using Microsoft API. This doesn’t mean you can’t have or search for more than 500 items in your directory.
Anything unclear or doesn’t work?
Post your question or comment here