Quick Link Plus lets you fit more quick links on the page while keeping the design crisp.
Here is an example of the Quick Links Plus web part.
Square or rounded links with FontAwesome icons:

Links with custom PNG’s:

If there are too many links for the section, the web part will show links in a slider carousel:

Or you can use this style to fit more links:

Mobile view:

Setting up the web part
Edit the page where you want to see quick links, and pick this app from the gallery:

You can add as many quick link apps as you need to a page.
10.
Adding a new or updating an existing link
-
Edit web part properties and click the Add/Remove Quick Links button

-
Add, remove, or re-order quick links as you see fit

NOTE: If you’d for your link to download a document (such as PDF), tick [Is this a download] checkbox. This will cause the web part to download a given file instead of opening it in the browser.
Using custom PNG icons
If you’d like to use a custom PNG icon for your quick links, please use a transparent square image with these dimensions: 650 x 650 pixels.
You can upload the icon when you add/edit quick links:

Changing quick links style
![]() Available in Quick Links Plus – Version May 6, 2025
Available in Quick Links Plus – Version May 6, 2025
You can make your quick links fit in smaller sections and still make the look great like this:

You can change the color of the button and the text by going to web part properties and adjusting colors to your liking:

You can also resize your links as you see fit.
You can even overlay quick links on another web part by using the margin slider–this will pull the quick links up or move them down:

Here is the end result of overlay over the banner:

Link Targeting: Show Quick Links to Specific Microsoft 365 Groups
![]() Available in Quick Links Plus – Version February 25, 2025
Available in Quick Links Plus – Version February 25, 2025
You can now display specific quick links only to members of selected Microsoft 365 Groups. This allows for more personalized and secure content visibility on your SharePoint pages.
Before You Begin
Please ask your Microsoft 365 administrator to confirm that the proper permissions have been granted.
![]() They can follow this guide:
They can follow this guide:
Grant Quick Links Plus permission to target links to specific M365 Groups
How to Create Microsoft 365 Groups
- M365 Groups can be created manually via the Microsoft 365 Admin Center.
- If you’ve created a Team Site, SharePoint automatically generates M365 Groups for Site Members and Site Owners.
Example:
If you’ve created a Team Site called “HR Site”, you’ll see a group named “HR Site Members”. This group is automatically generated and can be used for link targeting..
Targeting Links to a Specific Group
- Add or edit a Quick Link using Quick Links Plus.
- In the targeting section, search for the M365 Group name (e.g., HR Site Members).
- Select the group from the list.

Done!
Once you save the page, your selected links will only be visible to people in the specified group(s).
Want to Remove Targeting?
Simply clear the group name(s) from the text box. This will make the link visible to everyone.
Save Styles as Template
![]() Available in Quick Links Plus – Version April 23, 2025
Available in Quick Links Plus – Version April 23, 2025
You can fully customize the Quick Links Plus web part — apply your corporate fonts, colors, and styles — and save those settings as a template with just one click.
Go to web part properties under the Save Settings section, and click Save Current Settings as Template.

From now on, any new Quick Links Plus web part will automatically use your saved style settings as the default.
You can always tweak styles if needed–applying a template will not restrict your options, you simply have a better starting point.
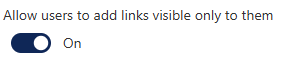
Personalized links: Allow users to add link only visible to them
![]() Available in Quick Links Plus – Version: May 14
Available in Quick Links Plus – Version: May 14
You can make it so users can add links of their own (only visible to them).
Here is how to set this up:
-
Go to Quick Links Plus web part properties and toggle this switch On:
-
Back in the web part, the + button will start showing. Click the + to add at least one personal link:
-
Now you need to give permissions to the list where links will be stored, so click (*) → Site contents
-
Look for a list called “PersonalizedQuickLinks” and click on the link to open this list
-
Click (*) → List Settings
-
On the settings page, click [Permissions for this list]
-
Click the Stop Inheriting Permissions button in the ribbon

-
Click Grant Permissions and in the popup specify “Everyone but external users”
-
Click Share. This will ensure when Readers add their own links, this list will allow them to store those links.


All done, here is how users will be able to add and manage their links:
Origami Personalized Links - Watch Video
