This article shows how to create a SharePoint calendar view that works with the Origami Calendar web part.
You can use views when you want:
- One calendar for Employee Events
- Another for Training
- Another for Leadership meetings
all from the same Events list.
In this example, you will:
- Create a classic SharePoint calendar view
- Filter it by the Category column
- Copy the view URL
- Paste that URL into the Origami Calendar web part settings so the web part only shows that set of events
Permissions note:
- The view does not change permissions.
- Users will only see events they already have access to in the Events list.
- The Calendar web part follows SharePoint security, so different users may see different events depending on their existing permissions. A Calendar View works similar to a document library view, with every step needing to be set up correctly.
Open the Events list
- Go to the SharePoint site that contains your calendar.
- Click the gear icon in the top right.
- Select Site contents.
- Open the Events list.
- At the top, click the Calendar tab so you see the classic calendar ribbon.


Create a new calendar view
- on the Calendar tab in the ribbon, select Create View.

- This opens the Settings › View Type page.
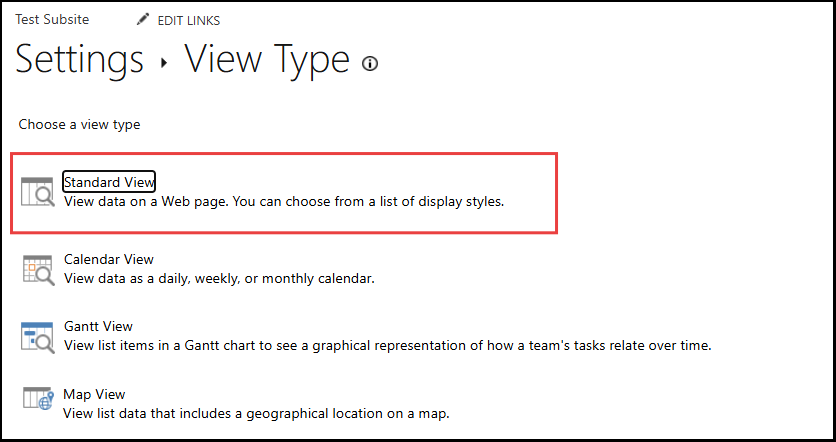
- Under Choose a view type, click Standard View.
- This choice keeps the setup simple
- On the next page, in View Name, give your view a unique name, for example Employee Events.

Add the filter by Category
We will filter events using the Category column and use our own custom value. Make sure you use the exact same value later when you create the event so it shows in this view.
- On the view settings page, scroll down to the Filter section.
- Select Show items only when the following is true.
- Set your filter to use Category. For example:
- Show the items when column:
Category - is equal to
Employee Wellness Day

- If you want to include more than one category, select Or, then add another filter row. For example:
- When column:
Category - is equal to:
Employee Health and Safety week
- Scroll to the bottom and click OK to save the view.
Copy the view URL
After saving, SharePoint opens your new view.
- In the browser address bar, copy the full URL of the view.
- It will look similar to:
https://test.sharepoint.com/sites/testSandbox/Lists/Events/Employee%20Events.aspx
- Keep this URL handy. You will paste it into the Origami Calendar web part later.

Add events that match your Category filter
Now that the view is set up, add events that use the same Category text.
- Make sure you are on your Events list and that your new view is selected in Current view (for example Employee Events).
- Click + new event.
- Fill in the usual fields: Title, Location, Start Time, and End Time.
- In the Category section:

- Select Specify your own value.
- Type the Category value exactly as you used it in the view filter.
- Same spelling
- Same spaces
- Same upper and lower case
- Example:
Employee Wellness Day
- Click Save.

If the Category text is not an exact match to what was entered in the view, the events will not appear in your custom view or in the Calendar web part that uses this view.
Connect the calendar view to the Origami Calendar web part
- Edit the page that contains your Origami Calendar web part.
- In the web part properties, go to Source of Events.
- Click Add/Remove SharePoint calendars.
- In Site URL of your calendar, paste the view URL you copied earlier.
- In Calendar list name, enter the name of your calendar list, for example
Events. - Click Save in the panel.
- Back on the page, click Save and close or Republish to save your changes.

